Cadwell Park Track Days - Circuit in detail
Detailed look at how to tackle the Cadwell circuit
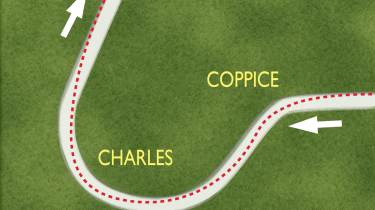
The start finish straight and CoppiceThe start finish straight is right down in the valley and the sharp end of the grid is situated on a slight incline. The reason I messed up the start of that TVR race was because the car rolled forward just as the lights went red. I checked it with the brakes to avoid the jump start penalty, then gave it too much as I moved the foot back across… On a flying lap you’ll move over to the right as you pass the pits, ready for the climb up to Coppice. This is quite straightforward but it is a relatively late turn; you will be going good and fast by then and the temptation is to turn too early because the road is fast running out. You must be patient and make an apex in the middle of the track, aiming to run along the left hand kerb ready for Charlie’s, which is a very early turn.
Charlie’s Charlies is actually two corners – or one 180 degree stretched and linked by a bit of straight. The problem (or the delight) is that the early part is the continuation of the climb which started at Coppice and both the crest and first apex are out of initial sight. Aim for an early apex which is just slightly out of your vision to the right, then let the car crest the rise and run out to the left hand kerb. Work up to this, remembering that if you make that turn too early, you’ll begin to run out of road and have to lift before you get there. That is less likely however than too late, which means you exit in the middle of the track when you want to be further to the left, ready for the second part.
If you’ve done the first part correctly you’ll have just a little bit of straight to negotiate and some time to be patient, waiting for the turn. This time it’s quite late – you’re aiming for an apex just past the mid point – but you need to be careful, and smooth. The road dives into a dip which you then run across rather than along and that will make a powerful rear drive car start to oversteer and slither you towards the kerb. A front wheel drive car will simply push wide as the front tyres lose the battle. The point is, you do need to be accelerating hard by the time you run along that kerb because the Park straight which follows is long, and is quite a steep uphill gradient. A good exit to Charlies is vital to a fast lap – and a successful defence of position into Park.
Park and Chris CurvePark looks easy but there’s a trap which is less than obvious from the driving seat. I have to confess falling out of a comfortable lead here on two occasions – once in a turbo Sierra and once in a TVR Tuscan. Only one of them cost me a championship… There were mitigating circumstances in the latter instance, like an unlimited supply of oil on the road which I was the first to find - but nevertheless, it’s as well to be prepared. The problem is a dip which you can’t see but which upsets the braking. You are also going extremely fast by the time you reach the braking area for Park which is a deceptively tight and narrow funnel bordered on each side by very rough kerbs. So, brake earlier than you think is necessary because you’ll be glad you did by the time you reach the turn-in. This is otherwise straightforward and just after the apex. Just watch the kerbs on the exit. Some cars can ride them but it will upset the traction in others.
Chris Curve is rather more complex and it depends entirely on the handling characteristics of your car. The safest way in the first instance – or until you are sure - is to leave it a bit later, run further round the outside of the track near the left hand kerb until you can see the rest of the corner, then gently aim for an apex some way round and on the right. If your car has more grip, this might allow you to turn earlier and carry more speed, but you need to be careful because you will discover any shortcoming after the time it’s possible to do anything about it.
Ideally, you should stay over to the left out of Park then aim for an apex which… just for once… is where the piece of kerb lies on your right. This is nicely early and will head you out in a long arc, gently bringing you closer to the left hand verge which you should aim to reach about halfway round the bend. You can then run along that verge, following the road as it continues to bend right towards the Gooseneck.
The idea in either case is to make as shallow a radius as possible but to make sure you are comfortably over to the left ready to start The Gooseneck.
Gooseneck This is the most technically difficult corner at Cadwell and the venue where many a perfect lap is screwed up. The trick is to concentrate on the second part.
Ideally, you want to be braking all the way through the first, right-handed part then flick the car left in the middle of the track and turn very early to point downhill for the second part, at the same time booting it good and hard to float the car through. This is an entry which is very hard to do, added to which you absolutely must be in a car which will let you do it – you certainly would not try it in an early Porsche Carrera for instance. Deliberately braking through a fast corner is something which is done only when you have complete confidence in the car’s characteristics…
The safer and easier way is to lose some speed before you get to the first right which is almost a continuation of Chris Curve. Then… ease the car into the turn, aiming to drive smoothly through the first part while bringing the car gently across the road towards the kerbs on the right. You must then aim almost immediately… almost before the right hander is finished… for an apex which is just… but only just… over the crest of the left hander which follows. This left hander is shallow but you need to make the commitment to go through it almost before you have finished the right hander which leads there. Doing that should put you in a position to point it early down the hill while using lots of power. Always remember that it is better to lose speed before you get to the Gooseneck, then put it back as you dive left to go down the hill.
Mansfield Another venue with maximum cockup factor. The dive down from The Gooseneck is already very steep but there’s an extra few degrees of fall just before you get to Mansfield. All too easy to leave your braking extra late and then have to cope with a steeper gradient that you didn’t bargain for. The car will either stand on its front wheels and lock the rears as you brake or it will lock an inside front as you turn. One way you spin on the way in, the other you run wide onto the grass and spin on the way out. Either way, you make a mess of the corner. Brake earlier than you think is necessary, then apex late and drive the car hard all the way out. It is quite a long way from Mansfield to The Mountain and you don’t want some gorilla thinking 50 yards behind is close enough to have a go. Come to think of it, the editor of a well known glossy motoring magazine drove in exactly such a twatlike manner and rammed the Ginetta in which I had led the last nine laps, at exactly that point of the circuit.
The Mountain The entry to The Mountain’s left-right sequence is straightforward as long as you remember that you are travelling v. fast when the time comes to apply the brakes for the first, left-hander, and that you need to turn late in order to make a proper entry to the second, right-handed part which climbs The Mountain. This is again straightforward as long as you arein the right place to start with – and you can use some of the kerb on the right (although too much will unbalance the car) - then, depending on what you are driving, you either lift at the top, or not. The crest always loosens the driving wheels and in a rear-drive car it will sling the wheels to the left but you can usually keep it planted and just entertain a bit. In a front drive car the wheelspin might just take the edge off the acceleration up to Hall Bends, plus it gives the transmission a real beating. In the wet, either form of drive needs more thought, and more care.
Hall Bends and The Hairpin Hall Bends feel narrower than they are, but most incidents here are a consequence of taking the first part too quickly. It’s a late-ish turn for the first right, to set you up for an apex just after the mid-point of the second, right handed part. That will give you some space to open out the entry to the third part which is another left hander – but it’s out of sight. You can’t see the road which now dives over a slight summit but making a deliberate effort to stay a bit to the right before diving over the crest will help you to point the car to brake in a straight line for the hairpin.
For this you simply must get the car slowed neatly and without locking wheels, smoothly select second (or in a race car, first) gear, then drive out with the minimum of wheelspin. If you boot it like a hero you will slither and snake while the man in front just drives past on the inside and away towards Barn. Patience and smoothness are the best techniques here, bravery only slows you down, beats the car and sets up the potential for a silly brush with the barriers.
Barn corner Barn is a long way round and feels almost like two corners linked in the middle but the main thing to remember here is that although it is tight-ish turn, the last half is fairly steeply downhill. If you are still turning when you get there, the slope will tend to loosen the car and edge it towards the left as you exit. You will then have to lift just when you need to be accelerating hard for the straight that follows. Smoothness yet again is the key and once you have familiarised yourself with the geography, try turning a little earlier and hugging the road to the right in the middle before letting a combination of the crest and a little extra application of power put you back on line. Too early has you slithering down the slope’s camber before you are ready. Too late and you simply waste time waiting to get on the power. A good exit from Barn sets you up for the drive down the rest of the slope past the pits and onward and upward towards Coppice. Cadwell is a great place but patience is the way to a fast lap and a car which is in a fit state to be driven rather than shovelled back to the paddock.