Rockingham track days: info, circuit maps and driving tips - Rockingham circuit guide: corner by corner
A turn-by-turn summary of Rockingham's International Super Sportscar Circuit
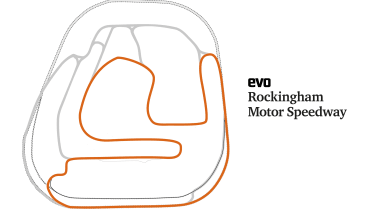
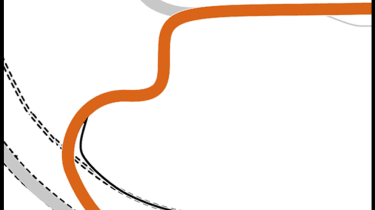
Here's your corner-by-corner guide to getting the best out of your lap of the Rockingham Motor Speedway International Super Sportscar Circuit.
> evo track days 2017 - book your spot now
Turn 1
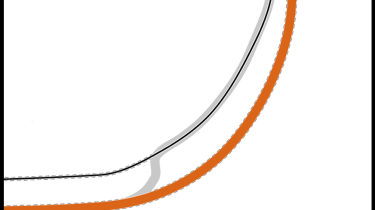
- Braking: Only the most powerful cars will need to be slowed. Be up near the wall
- Turn in: Use the gradient and dive down to the heart of the turn
- Accelerate: Let the car run back up towards the wall
This is very fast, but with seven degrees of banking most cars will have no problem taking it flat out. You do need to take a deliberate line through it, though, and it's sometimes helpful to short-shift into a highe gear before the turn rather than leaving it until the mid-point to change up. On the approach you should be right up against the wall, and then ease the car down into the heart of the turn without being aggressive with the steering. On the exit, allow the car to run gently back up towards the wall.
Turn 2 (Deene)
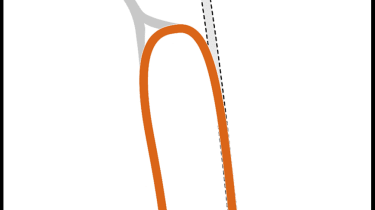
- Braking: Maximum braking from high speed to second gear. Easy to get this wrong
- Turn in: Very late and watch out for the effect of coming off the banking and onto the flat
- Accelerate: Traction can be tricky in high-power cars. Some kerb can be used
This is where you peel off the banking and there’s a marked step when you drop onto the flat that can lightly scrape the nose of particularly low-slung cars. Deene is a squared-off hairpin, but you should ignore the first kerb and just aim at the second from a late turn-in point. The braking up to this corner will be hard and heavy as you will be slowing from a very high speed down to second gear. However, if you mess up you can overshoot onto the continuation of the oval. From apex to exit the corner is a straightforward acceleration zone.
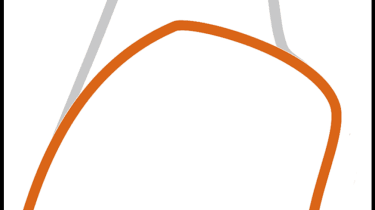
Turn 3 (Yentwood)

- Braking: Locking up is easy here as the track heads downhill
- Turn in: The line is quite obvious for this 90-degree right-hander
- Accelerate: The kerb on the outside can be used to open out the exit
It's easy to remember the corner names at Rockingham because they're written on large signs on the tyre walls. On paper this looks like a simple 90-degree right, but the road drops a little on the approach adding a small twist. However, the late turn and tight apex will see you right. Let the car run wide on the exit; use all of the road.
Turn 4 (Chapman Curve)

- Braking: Short and sharp, do it after the crest
- Turn in: Late, as you don't use the full width on the exit
- Accelerate: You need to bring the car back to the right immediately
This corner comes soon after Yentwood, but because of a crest it's blind on the approach. It only requires a little braking, though, so don't do this until you are over the crest and turn-in soon after. The apex is late but you don't need to use the full width of the road on the exit as you'll want to get immediately back over to the right to open out the first part of Pif Paf.
Turn 5 (Pif Paf)
- Braking: Not much, if any, required
- Turn in: The marshal post can beused as a guide, but look through the corner
- Accelerate: Use the full width of the track in the middle section of the corner
Turn in from the edge of the track once you are alongside the marshal's post and aim at an apex point at the head of the kerb. Once there, let the car run out wide towards the escape road. You are now halfway through this long corner with the trickiest bit to come. Run the car alongside the escape road, only bringing it back in again once you reach its end. Don't be overly aggressive with the steering here because the front tyres will not be able to respond. Instead, you should ease the car back towards the second apex, which you will see just after the infield access road. The throttle should be hard in by now and once at the apex you should unwind the lock and let the car run out to the edge of the track once more.
Turn 6 (Gracelands)

- Braking: This corner is faster than it appears, so braking is not heavy
- Turn in: Reasonably late as the corner is long
- Accelerate: Power should be hard on from the apex. Exit kerbs can be used
There's a small rise towards Gracelands that slightly obscures it from view. This is a long, quick left and therefore the turn in is quite late. The crest can upset the balance of the car, as can running on the apex kerb. If your car has a handling flaw it will be apparent here. You can use the wide exit kerb, but not if it's wet.
Turn 7 (Tarzan)
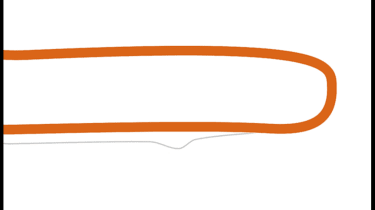
- Braking: Very hard braking is needed for this tight hairpin
- Turn in: Reasonably late as the corner is long
- Accelerate: Power should be hard on from the apex. Exit kerbs can be used
After a short straight you reach Tarzan, a hairpin that sees its fair share of overtaking action during a race weekend, mainly due to the width of the track, which makes it difficult to defend. The apex is three quarter of the way round the corner and that requires a late turn in. It's a relatively easy corner, but ensure you use the full width of the track on the exit - in fact it's possible to use the pitlane access road to open it out further. Getting out of the corner carrying as much speed as possible is vital as a long straight follows.
Turn 8 (Chicane)
- Braking: Needs to be as hard as the previous corner
- Turn in: Use the marshal's post as a guide to the turn point and follow the simple line through
- Accelerate: Made more complicated by the transition onto the banking
The final corner is perhaps the most fiddly of the lap. Use the end of the pit lane as a guide to braking and turn in opposite the marshal's post. The way through is quite obvious and the high kerbs make it impossible to steal any extra track. The most difficult part is the exit, which is complicated by the fact that you make the transition back onto the banked oval, so the angle of the tarmac changes sharply. Try to open the exit out as uch as possible and rub the car right up to the retaining wall. Any speed advantage you can gain here will be carried all the way down to Deene.
Find more on track cars, track days and track driving through the links below...