Bedford Track Days: info, circuit maps and driving tips - Bedford circuit guide: corner by corner
Here's your corner by corner guide to the South-West circuit at Bedford Autodrome
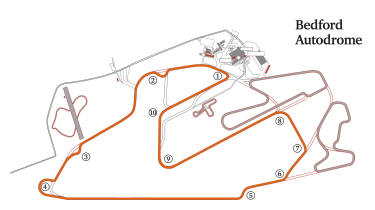
Here's your step-by-step guide to getting the best out of your lap at Bedford Autodrome.
> evo track days 2017 - book your spot now
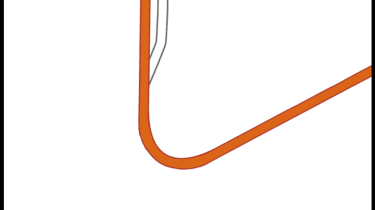
Turn 1 (Hangar Hairpin)
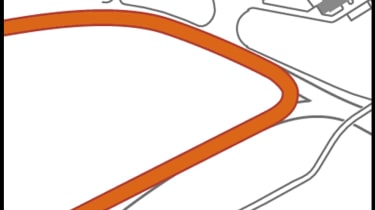
- Brake: Use the markers and painted tarmac to judge the braking point.
- Turn in: Very late, almost when you're at the corner itself
- Accelerate: From a late apex. Watch out for wasteful wheelspin
The high-speed approach means this is a test of the braking ability of both car and driver. Most cars will be travelling in fifth gear at three-figure speeds, so picking the correct braking point is crucial - there are marker boards to help. This is a text-book hairpin, so an aggressive late turn in generally works best, getting the steering phase out of the way early and opening out the exit. Some kerb can be taken at the apex but nothing is gained by running wide onto the concrete at the exit.
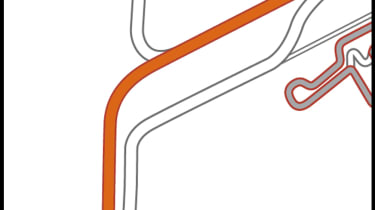
Turn 2 (Palmer Curves)
- Brake: Ensure the car is travelling in a straight line by cutting diagonally
- Turn in: At the first apex, then aim almost directly at the second
- Accelerate: As hard and as smoothly as possible. Rear-drive cars tend to oversteer, front-drivers will understeer
This is a technical sequence that puts the emphasis on both lateral grip and traction. A poor-handling car will struggle here. Turn left from the edge of the track and brake in a straight line right up to the first clipping point. If not coned it’s possible to cut the corner a little as there’s no kerb and this will help to open out the second part. Bring the car over to the right slightly to open out the left section a little, but don’t go too wide. Once on the second apex try to hug the white line for as long as possible to open out the final right-hander. You should be accelerating hard from the first apex, so don’t worry if you can’t hold the white line for long – it’s better to let the car run wide than excessively scrub off speed. By now the speed is really fast and it’s often worth short-shifting into fourth before making the transition to the final right-hander. If you have the first parts right the line through the final section is obvious as the corner opens out. Get as close to the gutter as possible at both the apex and exit, but avoid the drain covers. And don’t hold the car too tightly on the exit – this is the cause of many high-speed spins.
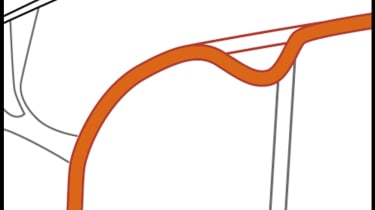
Turn 3 (Pif-Paf)
- Brake: Try to trail brake into the turn as this will be faster
- Turn in: Look through the bend and turn in when the line appears
- Accelerate: Get on the power hard and ride out the bumps
This comes up fast after the exit of Palmer Curves and requires heavy braking and a two-gear drop. Formula cars and some lightweight specials can brake all the way through the left, but for most Pif-Paf should be taken in two parts. Ensure the pitch angle of the car is not too extreme on entry or the car will oversteer as you turn left. If you avoid that you can actually accelerate a little before braking again for the right, and it’s possible to open things out by using some of the painted sections of track (don’t go near them in the wet). The exit is a little bumpy and curves left. In anything but a big-power rearwheel-drive machine you should be hard on the throttle here.
Turn 4 (Bank Complex)
- Brake: Firm but short. You can carry more speed into the first part than it seems
- Turn in: Don't hold the car too tight once you reach the apex
- Accelerate: Be patient. Only increase the gas when you can unwind the lock
The right-hander can usually be taken in third gear, while the long, slow left is definitely second gear. There are two possible approaches here. Those with lots of grip will use the full width on the exit from the right and then follow the white line around the first part of the left, only moving away as the corner opens out and the throttle can be meaningfully reapplied. In a frontdriver it’s often advantageous to open out the second part by not using the full width of the road on the exit of right-hander.
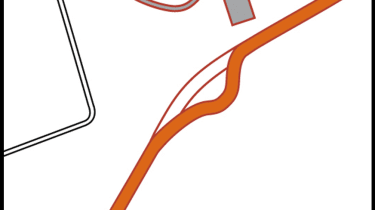
Turn 5 (The Flick)
- Brake: Needs to be firm, but speed still high
- Turn in: Don't steer too hard. Ease the car in
- Accelerate: From the first apex. Use full width on exit
A very fast approach into a very fast chicane. Use the marker boards as a braking reference and ensure you’re off the brakes by the turn-in point. There is space to make errors, but ensure you use all the road on the exit before moving back to the right for Harrier 1.
Turn 6 (Harrier 1)
- Brake: Like 'The Flick' it should be short and sharp
- Turn in: Carry good speed in - it's a quick turn
- Accelerate: Balance the car all the way through
A fast left that requires less braking than you might think at first. For the fully committed it’s possible to take some of the apex kerb and on the exit run past the white lines right out to the grass. There is a little extra tarmac here that really opens the corner out.
Turn 7 (Harrier 2)
- Brake: This turn is slower than the previous one, but braking here is straightforward
- Turn in: Late enough to see through the corner
- Acclerate: Hard and as cleanly as possible
Slower than Harrier 1 and quite a bit easier, although reference points can be tricky due to the flat nature of this airfield circuit. Requires only a basic level of technique to master.
Turn 8 (Crab)
- Brake: Late and hard, easy enough
- Turn in: This is a simple 90-degree left hander, but don't go in too early
- Accelerate: As soon as you can see the exit. A long straight follows
So named because experienced drivers will go through here sideways. This is a long left taken in third gear. Turn in quite late to open the corner out as much as possible. There is some extra tarmac on the exit should you need it. Exit speed is crucial as a long straight follows, but as a note of caution this is one of the few bends at Bedford in the vicinity of a barrier.
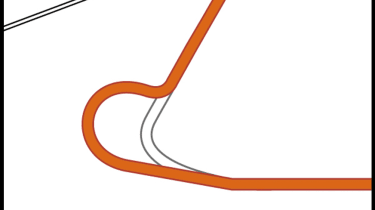
Turn 9 (O'Rouge Right)
- Brake: Very hard. From such big speeds it's easy to get it wrong
- Turn in: Very late, almost at the point where the road turns
- Acclerate: From the late apex, you should be winding off lock by now
A much tighter corner than if approached from the other direction on the West Circuit. Heavy braking is required and the turn-in is exceptionally late – almost at the end of the straight itself – with the apex three quarters of the way round. Turn-in and apex too early and you’ll run very wide, but at least there is the space to do this.
Turn 10 (Tower)
- Brake: Come off the brakes early enough to ensure the car is settled as you turn
- Turn in: Later than it appears at first
- Accelerate: Exit speed important, so get on it early. Use run off if necessary
Fast, and requires commitment and skill. However, there’s also plenty of runoff, so you can really push hard in the knowledge that should you require extra room, it’s there for you. This right needs firm braking, but not so hard that the nose is still down on entry. And don’t be tempted to turn in too early. From apex to exit you should be balancing the car with a combination of throttle and steering.
Find more on track cars, track days and track driving through the links below...